반응형

How To Install Apache Tomcat 7 on CentOS 7 via Yum

Posted Jun 15, 2015


Introduction

Apache Tomcat is a web server and servlet container that is used to serve Java applications. Tomcat is an open source implementation of the Java Servlet and JavaServer Pages technologies, released by the Apache Software Foundation.

This tutorial covers the basic installation and some configuration of Tomcat 7 with yum on your CentOS 7 server. Please note that this will install the latest release of Tomcat that is in the official Ubuntu repositories, which may or may not be the latest release of Tomcat. If you want to guarantee that you are installing the latest version of Tomcat, you can always download the latest binary distribution.

Note: Tomcat can be installed automatically on your Droplet by adding this script to its User Data when launching it. Check out this tutorial to learn more about Droplet User Data.

Prerequisites

Before you begin with this guide, you should have a separate, non-root user account set up on your server. You can learn how to do this by completing the initial server setup for CentOS 7 tutorial. We will be using the demo user for the rest of this tutorial.

Install Tomcat

Now you are ready to install Tomcat 7. Run the following command to install the Tomcat package:

  • sudo yum install tomcat

Answer y at the confirmation prompt to install tomcat. This will install Tomcat 7 and its dependencies, such as Java, and it will also create the tomcat user.

Most of the important Tomcat files will be located in /usr/share/tomcat. If you already have a Tomcat application that you want to run, you can place it in the /usr/share/tomcat/webapps directory, configure Tomcat, and restart the Tomcat service. In this tutorial, however, we will install a few additional packages that will help you manage your Tomcat applications and virtual hosts.

Let's make a quick change to the Java options that Tomcat uses when it starts. Open the Tomcat configuration file:

  • sudo vi /usr/share/tomcat/conf/tomcat.conf

Add the following JAVA_OPTS line to the file. Feel free to change the Xmx and MaxPermSize values—these settings affect how much memory Tomcat will use:

/etc/default/tomcat7 — JAVA_OPTS
JAVA_OPTS="-Djava.security.egd=file:/dev/./urandom -Djava.awt.headless=true -Xmx512m -XX:MaxPermSize=256m -XX:+UseConcMarkSweepGC"

Save and exit.

Note that the Tomcat service will not be running yet.

Install Admin Packages

If you are just getting started with Apache Tomcat, you will most likely want to install some admin tools that will help you deploy your Java applications and manage your virtual hosts. Luckily, there are packages that include these tools as web applications.

To install the default Tomcat root page (tomcat-webapps), and the Tomcat Web Application Manager and Virtual Host Manager (tomcat-admin-webapps), run this command:

  • sudo yum install tomcat-webapps tomcat-admin-webapps

Answer y at the confirmation prompt.

This adds the ROOT, examples, sample, manager, and host-manager web apps to the tomcat/webapps directory.

Install Online Documentation (Optional)

If you want to install the Tomcat documentation, so that all of the links on the default Tomcat page will work, run this command:

  • sudo yum install tomcat-docs-webapp tomcat-javadoc

Answer y at the prompt to install the documentation packages.

Configure Tomcat Web Management Interface

In order to use the manager webapp installed in the previous step, we must add a login to our Tomcat server. We will do this by editing the tomcat-users.xml file:

  • sudo vi /usr/share/tomcat/conf/tomcat-users.xml

This file is filled with comments which describe how to configure the file. You may want to delete all the comments between the following lines, or you may leave them if you want to reference the examples:

tomcat-users.xml excerpt
<tomcat-users>
...
</tomcat-users>

You will want to add a user who can access the manager-gui and admin-gui (the management interface that we installed earlier). You can do so by defining a user similar to the example below. Be sure to change the username and password to something secure:

tomcat-users.xml — Admin User
<tomcat-users>
    <user username="admin" password="password" roles="manager-gui,admin-gui"/>
</tomcat-users>

Save and exit the tomcat-users.xml file.

Now we're ready to start the Tomcat service.

Start Tomcat

To put our changes into effect, restart the Tomcat service:

  • sudo systemctl start tomcat

If you started the service earlier for some reason, run the restart command instead:

  • sudo systemctl restart tomcat

Enable Tomcat Service

If you want Tomcat to run every time the server is booted up, you will need to enable the service:

  • sudo systemctl enable tomcat

Now we're ready to access the web interface.

Access the Web Interface

Now that Tomcat is up and running, let's access the web management interface in a web browser. You can do this by accessing the public IP address of the server, on port 8080:

Open in web browser:
http://server_IP_address:8080

You will see something like the following image:

Tomcat root

As you can see, there are links to the admin webapps that you installed earlier.

Let's take a look at the Manager App, accessible via the link or http://server_IP_address:8080/manager/html:

Tomcat Web Application Manager

The Web Application Manager is used to manage your Java applications. You can Start, Stop, Reload, Deploy, and Undeploy here. You can also run some diagnostics on your apps (i.e. find memory leaks). Lastly, information about your server is available at the very bottom of this page.

Now let's take a look at the Host Manager, accessible via the link or http://server_IP_address:8080/host-manager/html/:
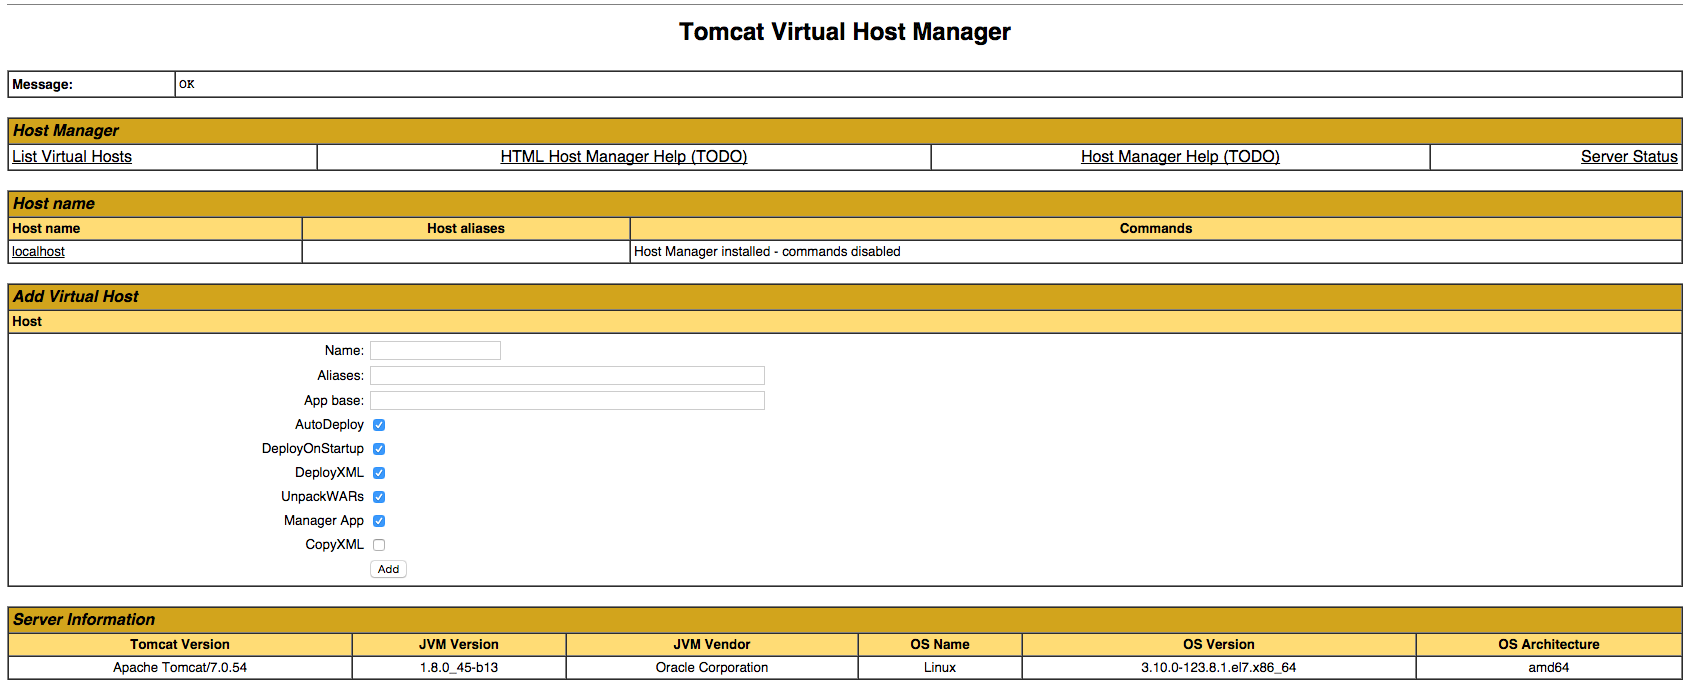
Tomcat Virtual Host Manager

From the Virtual Host Manager page, you can add virtual hosts to serve your applications from.

Conclusion

Your installation of Tomcat is complete! Your are now free to deploy your own Java web applications!
반응형
LIST
반응형

Gradle 시작하기

Maven 을 대체할수 있는 Groovy DSL 기반 어쩌구 저쩌구 하는데.. 다 됐고! Spring 이 빌드 시스템을 Maven 에서 Gradle 로 변경했다고 한다.

Gradle 이 왜 Maven 보다 좋은지, 왜 사용해야하는지를 알고 싶다면 글 마지막 부분에 있는 여기 를 참고하도록 하자.

1. Installing Gradle

먼저 여기 를 통해 Gradle 을 다운받자. 바이너리를 받으면 되고 이후에는 적당한 폴더에 압축을 풀면 된다. 그 후에는 가이드 를 따라서 환경변수를 등록하면 된다. 내 경우에는 C:\gradle 에 설치를 했다.

// 환경변수 추가
GRADLE_HOME - 'C:\gradle'
Path - 'C:\gradle\bin'

cmd > gradle -v // 터미널에서 Gradle 버전 확인
------------------------------------------------------------
Gradle 1.10
------------------------------------------------------------

Build time:   2013-12-17 09:28:15 UTC
Build number: none
Revision:     36ced393628875ff15575fa03d16c1349ffe8bb6

Groovy:       1.8.6
Ant:          Apache Ant(TM) version 1.9.2 compiled on July 8 2013
Ivy:          2.2.0
JVM:          1.7.0_45 (Oracle Corporation 24.45-b08)
OS:           Windows 7 6.1 x86


2. Installing Gradle on STS

이건 더 쉽다. Sping Tool Suite 에서 Dashboard -> Install Extension -> Gradle Support

3. Making Build Script

Gradle BuildProjectTask 라는 단위로 나누어진다. 하나의 Build는 여러개의 Project로 나뉠 수 있고 다시 Project는 하나 이상의 Task 로 나뉠 수 있다. Project는 웹 어플리케이션 배포나, Jar 컴파일등의 작업으로 볼 수 있고 이걸 하기 위해서 진행되는 세부적인 작업이 Task라고 보면 된다. 좀 더 정확한 설명을 위해 원문을 첨부한다.

Everything in Gradle sits on top of two basic concepts: projects and tasks.

Every Gradle build is made up of one or more projects. A project represents some component of your software which can be built. What this means exactly depends on what it is that you are building. For example, a project might represent a library JAR or a web application. It might represent a distribution ZIP assembled from the JARs produced by other projects. A project does not necessarily represent a thing to be built. It might represent a thing to be done, such as deploying your application to staging or production environments. Don’t worry if this seems a little vague for now. Gradle’s build-by-convention support adds a more concrete definition for what a project is.

Each project is made up of one or more tasks. A task represents some atomic piece of work which a build performs. This might be compiling some classes, creating a JAR, generating javadoc, or publishing some archives to a repository.


그럼 실제 스크립트를 보도록 하자. 프로젝트 내에 build.gradle 파일이 하나씩 존재하며 gradle build처럼 실행시킬 수 있다.build란 단어 대신에 다른task 이름이 올 수 있다. gradle task1 처럼.


// gradle.build 
// created by STS Gradle Extension with Java Quickstart Option

// Java, Eclipse Project
apply plugin: 'java'
apply plugin: 'eclipse'

sourceCompatibility = 1.5
version = '1.0'
jar {
    manifest {
        attributes 'Implementation-Title': 'Gradle Quickstart', 'Implementation-Version': version
    }
}

// Maven Repository 사용
repositories {
    mavenCentral() 
}

// 사용하는 Maven Repository 지정
dependencies {
    compile group: 'commons-collections', name: 'commons-collections', version: '3.2'
    testCompile group: 'junit', name: 'junit', version: '4.+'
}

test {
    systemProperties 'property': 'value'
}

uploadArchives {
    repositories {
       flatDir {
           dirs 'repos'
       }
    }
}


gradle test 를 통해 테스트만 실행하거나, gradle build를 통해 테스트를 포함해서 빌드를 실행할 수 있다.


다음번에는 조금 더 자세히 빌드 스크립트에 대해서 알아보겠다.

4. 후기

Gradle 에선 Groovy 를 사용한다는데 중간에 Gradle User Guide 보다가 소름 돋아서 후기를 남긴다. 디렉토리 이름을 받아 존재하는 파일들을 배열로 돌려주는 Groovy 코드.

File[] fileList(String dir) {
    file(dir).listFiles({file -> file.isFile() } as FileFilter).sort()
}

이게 함수형 언어를 사용하는 진짜 이유다. Java 였다면 얼마나 코드가 길어졌을까..


반응형
LIST
반응형

Gradle

설치

  • 설치 파일 압축을 풀고 설치 경로를 GRADLE_HOME 환경변수로 설정
  • GRADLE_OPTS에 Gradle 전용 JVM 옵션 설정
  • GRADLE_USER_HOME : 없으면 $HOME/.gradle. 여기에 의존 *.jar 파일등이 저장된다.
  • JAVA_OPTS에 자바 애플리케이션 공용 JVM 옵션 설정
  • *.build 파일의 인코딩
    • 기본적으로 Java의 file.encoding 시스템 프라퍼티를 따른다.
    • 윈도우 환경에서 UTF-8로 빌드 파일을 만들려면 GRADLE_OPTS=-Dfile.encoding=UTF-8 형태로 강제 지정
export GRADLE_OPTS="-Dfile.encoding=UTF-8 -Xmx512m -XX:PermSize=64m -XX:MaxPermSize=256m"

실행속도 높이기

  • ${HOME}/.gradle/gradle.properties
    org.gradle.daemon=true
  • 이제부터 Gradle이 데몬으로 떠서 실행되기 때문에 초기 로딩 시간이 줄어든다.
  • 3시간동안 Gradle 작업이 없으면 데몬이 자동 종료된다.

스크립트에서 사용할 인증 정보 분리해두기

build setup

  • 프로젝트를 시작할 때 gradle init를 실행하면 현재 디렉토리에 Gradle 관련 기본 파일들을 생성해준다.(구버전은 setupBuild)
  • Maven 프로젝트 디렉토리에서 실행하면 자동 컨버팅을 실행한다.
  • 실행시 프로젝트 구조를 Java library로 지정하기(1.7 이후)
    gradle init --type java-library
     
    # --type 을 생략하면 basic 으로 지정된다.
  • Project Types
    • pom
    • basic
    • java-library
    • groovy-library
    • scala-library
  • Project 디렉토리 구조 생성 task
    // 적용된 프로그래밍 언어 플러그인에 따라 소스 트리 구조 자동 생성
    task initSrc << {
        project.sourceSets*.allSource.srcDirTrees.flatten().dir.each { dir ->
            dir.mkdirs()
        }
    }

명령 실행과 옵션

  • 기본적으로 gradle을 통해 실행되는 단위를 “Task 태스크”라고 한다.(Ant의 target, Maven의 phase와 유사한 개념)
  • 태스크는 의존 관계에 따라 단 한 번만 실행된다.
  • -q : quiet. 로그 안 찍음. Gradle Logging
  • -x 태스크 : 해당 테스크는 실행하지 않음.
  • --continue : 빌드 실패시 즉시 종료하지 않고, 독립적인 태스크들은 모두 수행하고 종료한다.
  • -d|--debug : Debug 정보 및 stacktrace 출력
  • 태스크 축약
    • dist → di 형태로 최소한 알아볼 수 있는 만큼만 적어도 됨
    • 낙타 표기 compileTest → cT
  • -b 빌드파일 : build.gradle 이 아닌 다른 빌드 파일을 선택해 실행한다. 이 경우 settings.gradle 은 무시된다.
  • -p 프로젝트명 : 멀티 프로젝트에서 어떤 서브 프로젝트를 선택해서 실행 할 경우. -b 대신 -p를 사용할 것.
  • -P프라퍼티이름=값 : 프라퍼티 지정. 값 없이 프라퍼티만 지정해도 된다.
    • 이 값은 빌드 스크립트에서 프라퍼티이름으로 바로 접근 가능하다.
    • 프라퍼티 이름에 “my.property” 형태로 돼 있다면 project.get('my.property') 형태로 접근 가능하다.
  • --gui : GUI 환경에서 태스크를 실행하고 관리한다.
  • --recompile-scripts : build.gradle들 다시 컴파일한다.
  • 환경변수 TERM=dumb으로 하면 Gradle의 진행 상황 로그가 안나오게 된다.
  • Task 상세 도움말은 help --task [태스크이름] 으로 볼 수 있다.
    gradle help --task wrapper  

빌드 정보 확인

  • projects : 프로젝트 목록
  • tasks : 태스크 목록
    • 기본적으로 태스크 그룹에 속한 것만 보여준다.
      dist {
          description = '태스크 설명'
          group = '태스크의 그룹'
      }
      // 혹은
      dist.description = '태스크 설명'
      dist.group = '태스크의 그룹'
    • --all : 태스크 그룹에 상관없이 다 보여줌
  • [자식프로젝트명:]dependencies : Root 혹은 지정 프로젝트의 의존성 트리를 보여준다.
    • –configuration runtime : runtime 의존성만 보여준다.
  • [자식프로젝트명:]properties : Root 혹은 지정 프로젝트의 속성 값들을 모두 보여준다.
  • --profile : 빌드 수행을 프로파일링하여 성능 정보를 ./build/reports/profile 디렉토리에 저장한다.
  • -m 태스크들 : 태스크를 실제 수행은 하지 않고, 해당 태스크와 함께 실행되는 모든 태스크 목록을 순서대로 보여준다.

태스크 튜토리얼

  • 의존성 : task name(depdendsOn: 다른태스크 | [task1, task2, …]) … 형태로 만든다.
  • task “태스크이름” … : 태스크 이름이 문자열 GString이 될 수 있기 때문에 동적으로 태스크를 생성하는 것이 가능하다.
  • 태스트의 시작과 끝 액션
    task hello << {
        println 'Hello Earth'
    }
    hello.doFirst {
        println 'Hello Venus'
    }
    hello.doLast {
        println 'Hello Mars'
    }
    hello << {
        println 'Hello Jupiter'
    }
    • < <는 doLast와 같은 의미이다. doFirst/doLast는 여러개 선언될 수 있으며 doFirst가 선언된 순서로 먼저 실행되고, 그 뒤에 doLast가 선언된 순서대로 실행된다.
  • Task Properties : 태스크 안에서 ext.프라퍼티명 = 값 형태로 선언하면 다른 위치에서 태스크명.프라퍼티명 으로 해당 값을 읽을 수 있다.
  • 기본 태스크
    defaultTasks 'clean', 'run'
     
    task clean << {
    ...
    }
    task run << {
    ...
    }
    • 멀티 프로젝트에서 각 하위 프로젝트는 자신만의 기본 태스크를 선언할 수 있다. 기본 태스크가 없으면 부모의 기본 태스크를 수행한다.
  • 수행할 태스크에 따라 조건 주기
    gradle.taskGraph.whenReady { taskGraph ->
        if (taskGraph.hasTask(release)) {
            // release 라는 태스크를 수행할 예정일때 미리 실행할 코드
        } else {
            // release 라는 태스크를 수행할 예정이 아닐 때 미리 실행할 코드
        }
    }

Java 개발하기

다음 java 개발 관련 항목들을 읽어본다.

DSL

  • Groovy 빌드 파일은 기본적으로 Project 클래스의 인스턴스이다.
  • 빌드 파일에 등장하는 변수나 메소드 중에서 미리 선언된 것이 아니라면 Project 클래스에서 해당 속성을 찾는다.
  • Project 객체는 project로도 접근 가능하다.

Project 객체의 기본 프라퍼티들

  • project Project : 자기 자신의 인스턴스
  • name String : 프로젝트 디렉토리명
  • path String : 프로젝트의 Fully Qualified Name
  • description String : 프로젝트 설명
  • projectDir File : 빌드 스크립트가 있는 프로젝트 디렉토리
  • buildDir File : projectDir/build 이 값을 바꾸면 빌드 디렉토리를 바꿀 수 있게 되는 것이다.
  • group Object : unspecified - 직접 지정
  • version Object : unspecified - 직접 지정
  • ant AntBuilder : AntBuilder 인스턴스

변수 선언

  • 로컬 변수 : def 변수명으로 선언. 해당 스크립트 로컬에서만 접근 가능하다.
  • ext 변수 : 프로젝트 전체와 서브 프로젝트에서도 접근 가능하다.
  • ext 변수 선언과 사용
    ext.javaVersion = '1.7' // 한개씩 선언
    ext {
        // 여러개 한꺼번에 선언
        springVersion = '3.1.0.RELEASE'
        emailNotification = 'build@master.org'
    }
     
    // 가변 Key, 가변 값 형태로 코드를 통해 프라퍼티를 추가할 때는 아래 방식을 사용한다.
    project.ext['keyname'] = 'value'
     
    task hello << {
        println "javaVersion : ${javaVersion}"
        println "springVersion : ${springVersion}"
        println "emailNotification : ${emailNotification}"
    }

스크립트 컴파일

  • 모든 빌드 스크립트는 컴파일하여 .gradle 에 저장하고 캐시된다.
  • 빌드 파일이 변경되면 그 때 재컴파일 한다.
  • --recompile-scripts 옵션을 주면 강제 재컴파일 한다.

이것 저것

디렉토리 생성

  • 여러 태스크에서 특정 디렉토리를 필요로 할 경우에는, 디렉토리 생성 태스크를 만들고 다른 태스크가 그 태스크에 의존하도록 만든다.
classesDir = new File('build/classes')
task resources << {
    classesDir.mkdirs()
    // do something
}
task compile(dependsOn: 'resources') << {
    if (classesDir.isDirectory()) {
        println '필요한 디렉토리가 존재하네요.'
    }
    // do something
}

Gradle 프라퍼티와 시스템 프라퍼티

  • -D프라퍼티명=값으로 시스템 프라퍼티를 추가할 수 있다.
  • gradle.properties를 통해 프라퍼티를 추가할 수 있다.
    • $USER_HOME/.gradle/gradle.properties 혹은
    • 프로젝트홈/gradle.properties
    • $USER_HOME에 있는 것이 우선한다.
    • 여기 지정된 값을 project 객체를 통해 접근할 수 있다.
  • -P프라퍼티명=값으로 project 객체에 프라퍼티를 추가한다.
  • 환경변수 ORG_GRADLE_PROJECT_프라퍼티이름=값으로 project 객체에 프라퍼티를 추가한다.
  • 시스템 프라퍼티 org.gradle.project.프라퍼티이름=값으로 project 객체에 프라퍼티를 추가한다.
  • gradle.properties의 프라퍼티 중에 systemProp.으로 시작하는 프라퍼티는 시스템 프라퍼티로 변환된다.
    • gradle.properties
      gradlePropertiesProp=gradlePropertiesValue
      systemPropertiesProp=shouldBeOverWrittenBySystemProp
      envPropertiesProp=shouldBeOverWrittenByEnvProp
      systemProp.system=systemValue
    • build.gradle
      task printProps << {
          println commandLineProjectProp
          println gradlePropertiesProp
          println systemProjectProp
          println envProjectProp
          println System.properties['system']
      }
    • 실행하면
      > gradle -q -PcommandLineProjectProp=commandLineProjectPropValue -Dorg.gradle.project.systemProjectProp=systemPropertyValue printProps
      commandLineProjectPropValue
      gradlePropertiesValue
      systemPropertyValue
      envPropertyValue
      systemValue

프로젝트 프라퍼티 검사

  • 프로젝트 프라퍼티는 빌드 스크립트에서 프라퍼티 이름으로 바로 접근 가능하다. 하지만 프라퍼티가 존재하지 않으면 예외가 발생한다.
  • hasProperty('propertyName')으로 프라퍼티의 존재 여부를 검사할 수 있다.

외부 빌드 스크립트로 프로젝트 구성하기

외부 *.gradle 빌드 스크립트를 만들어서 불러올 수 있다.

  • build.gradle에서 other.gradle을 불러온다.
    apply from: 'other.gradle'
  • other.gradle
    println "configuring $project"
    task hello << {
        println 'hello from other script'
    }
  • 실행하면
    > gradle -q hello
    configuring root project 'configureProjectUsingScript'
    hello from other script

임의의 객체 구성하기

configure 메소드로 임의의 객체를 구성할 수 있다.

  • build.gradle
    task configure << {
        pos = configure(new java.text.FieldPosition(10)) {
            beginIndex = 1
            endIndex = 5
        }
        println pos.beginIndex
        println pos.endIndex
    }
  • 실행하면
    > gradle -q configure
    1
    5

외부 스크립트로 임의의 객체 구성하기

  • build.gradle
    task configure << {
        pos = new java.text.FieldPosition(10)
        // 외부 스크립트 적용
        apply from: 'other.gradle', to: pos
        println pos.beginIndex
        println pos.endIndex
    }
  • other.gradle
    beginIndex = 1;
    endIndex = 5;
  • 실행하면
    > gradle -q configure
    1
    5

캐싱 cache

Gradle은 컴파일한 스크립트를 캐싱한다. 프로젝트에서 처음으로 빌드를 실행하면 .gradle 디렉토리가 만들어지고 거기에 컴파일된 스크립트가 들어간다. 다음에 다시 빌드를 실행하면 스크립트에 변경이 없다면 컴파일 해뒀던 것을 실행한다. 그렇지 않으면 재 컴파일을 하고 캐시에 새로운 버전이 들어간다. --recompile-scripts 옵션으로 실행하면 캐시를 삭제하고 모두 다시 컴파일해서 캐시에 새로 저장한다.

자세히 살펴보기

Plugins

읽을꺼리

반응형
LIST
반응형

자바 :: JAVA :: Thread :: 쓰레드 :: 다중 상속

 
쓰레드(Thread)
한개의 프로그램 (한개의 프로세스)에서 여러개의 동시(시분할)작업을 시키고 싶을때.
하나의 프로세스 안에서 여러개의 병렬 Thread가 동시에 진행될수 있다.

여러개의 프로세스를 동시작업을 하면 속도, 리소스의 비용이 많이 들기 때문에
한개의 프로세스안에서 여러 쓰레드(작업단위)를 두어,
  가벼운 프로세스를 여러개 돌리는 효과

즉 작업의 단위가 여러개 라는건 반복문을 멀티로 돌릴 수 있다.
    1. 시계를 만들어 돌리고
    2. 키보드의 입력을 받으며 출력
    3. 이미지가 계속 바뀌면서 동적으로 움직인다.


1)하나의 프로그램은 하나의 프로세스로 동작.
   하나의 프로세스는 최소 한개의 쓰레드로 동작(주 쓰레드)
   main()메소드가 시작하면 main쓰레드가 동작
2)주 쓰레드는 별도의쓰레드를 생성하지 않고 System.exit(0)를 호출하지 않는다면,
   main()메소드가 종료될때 주 쓰레드는 종료 된다.
   주 쓰레드가 종료되면 프로세스안에 쓰레드가 하나도 없기 때문에
   프로세스는 종료-->프로그램 종료
3)만일 도중에 별도의 쓰레드를 만든다면 이 프로세스는 동시에 실행되는
   복수개의 쓰레드를 가짐  이렇게 나중에 만들어진 쓰레드는 main()메소드가
   시작점이 아니고 run()메소드가 시작점이자 종료점이다.
4)복수의 쓰레드를 가진 프로세스는 주 쓰레드(main 쓰레드)를 포함한
   모든 쓰레드가 종료해야 비로서 종료한다.
   일반적으로 한 프로세스내의 생성된 모든 쓰레드가 종료되야 프로세스가 종료됨.

쓰레드가 하나일경우
│프로세스시작 ─────────────────  끝│
│main 쓰레드 시작 ─────────────── 끝│
   (main()함수 시작)                            (main()함수 끝)


쓰레드가 여러개일 경우
│프로세스시작 ───────────────────────────────  끝│
│main 쓰레드 시작 ───────────────── 끝│
           | Thread1시작 ───────────────────── 끝│
               (run()함수시작                                              (run()함수 끝)
               | Thread1시작 ──────────────────────────  끝│


쓰레드 만들기(어떻게 Thread를 만드는가?)
1.Thread class를 상속받아 사용하면 우리 class는 Thread로 동작
  (Thread - 병렬, 동시에, 멀티로)

2.run()함수를 call하면 실제 이때 새로운 Thread가 탄생

   main쓰레드는 main()함수가 진입지점
   그외 사용자 정의 쓰레드는 run()함수가 진입지점

쓰레드의 사용
  • 구현하고자하는 클래스가 Thread 클래스를 상속 받게한다.
  • run()메소드를 오버라이딩해서 쓰레드로 작동해야 하는 코드 삽입.
  • 클래스의 객체 생성
  • Start()메소드를 호출한뒤 쓰레드 실행

아래의 예제로 기본적인 Thread사용법을 알아보겠습니다.
 Given : Thread1.java
 1
2
3
4
5
6
7
8
9
10
11
12
13
14
15
16
17
18
19
20
21
22
23
24
25
26
27
28
29
30
31
32
34
35
36
37
38
39
40
41
42
43
44
45
46
47
import java.util.*;
public class Thread1 extends Thread{
    //extends Thread는 다중작업을 시작하겠다는 선언이다.
    
    public static void main(String[] args){    //main쓰레드 생성 지점.
        System.out.println("쓰레드를 확인해보자.");
        //현재 돌고있는 쓰레드를 객체로 반환.
        Thread ct =Thread.currentThread();
        String name = ct.getName();
        System.out.println("현재 쓰레드 이름 : " + name);
       
        ct.setName("my");
        System.out.println(ct.getName());
       
        //현재 몇개의 쓰레드가 돌고 있나?
        System.out.println("쓰레드 갯수 : " + Thread.activeCount());
       
        //쓰레드 여러개 동작하게하기
        Scanner sc = new Scanner(System.in);
        String line =null;
       
        Thread1 t1= new Thread1();
        t1.start(); //run()메소드를 호출하려면 start()메소드를 호출함.
       
        while(true){    //main쓰레드가 1가지 작업밖에 하지 못한다..
            System.out.print("문자를 입력하세요 : ");
            line = sc.next(); //사용자가 문자열 치고 엔터치기 기다린다.
            System.out.println("입력하신 문자열은 : " + line + "입니다.");
            System.out.println(line);
           
            if(line.equals("quit")){
                break;
            }
        }
    }//main 쓰레드 종료지점.
    public void run(){        //새로운 쓰레드의 진입지점.
        System.out.println("새로운 쓰레드가 생성됩니다.");
        for(int i = 1 ; i<100; i++){
            System.out.println(Thread.currentThread().getName()+ " : "+ i);
            System.out.println("현재 쓰래드 갯수 : " + Thread.activeCount());
           
            try{ sleep(1000);
            }catch(Exception e){}
        }
    }//새로운 쓰레드의 종료지점
}

참조]위 예제는 for문으로 1~100까지 "현재쓰래드 갯수 i"를 출력하게 하고
        사용자로부터 키보드 값을 받아 출력하는.. 두가지일을 하는 예제입니다.


 Given : Thread2.java
 1
2
3
4
5
6
7
8
9
10
11
12
13
14
15
16
17
18
19
20
21
22
23
24
25
26
27
28
29
30
31
32
34
35
36
37
38
39
40
41
42
43
44
45
public class Thread2 extends Thread{
    public static void main(String[] args){
        System.out.println("::::::::main쓰레드 시작::::::::");
       
        MyThread1 mt1 =new MyThread1();
        MyThread2 mt2 =new MyThread2();
        mt1.start();
        mt2.start();
       
        for(int i=0; i<5; i++){
            System.out.println();
            System.out.println("main Thread : "+ i);
            System.out.println();
            try{
                Thread.sleep(3000);
            }catch(Exception e){}
        }
       
        System.out.println("::::::::main쓰레드 종료::::::::");
    }
}

class MyThread1 extends Thread{
    public void run(){
        for(int i=1; i<7; i++){
            System.out.println("MyThread1 : " + i);
            try{
                sleep(1000);    //1초마다 한번씩 cpu처리를 받음.
            }catch(Exception e){}
        }
        System.out.println("MyThread1 종료");
    }
}
class MyThread2 extends Thread{
    public void run(){
        for(int i=1; i<5; i++){
            System.out.println("MyThread2 : " + i);
            try{
                sleep(2000);
            }catch(Exception e){}
        }
        System.out.println("MyThread2 종료");
    }
}

참조]위 예제는 main 쓰레드와 'MyThread1', 'MyThread2' 쓰레드를 이용하여 시간차를
       주고 메시지를 출력하는 예제입니다.


Thread-Runnable 인터페이스
     
자바는 다중 상속을 지원하지 않기 때문에 새로운 클래스가 다른 클래스를
 상속 받는다면 Thread 클래스를 상속하여 사용할 수 없다.
이때 Runnable 인터페이스를 구현하여 쓰레드를 사용하게 된다.
참고 ──────────────────
class A{
   aaa(){A}
}
class B{
   aaa(){B}
}
class extends A,B{}  
──────────────────────
위 코드처럼 다중상속은 불가능하다. 하지만..
아래의 코드 처럼 멀티 implements는 가능하다.
──────────────────────
interface A{
  aaa(){A}
}
interface B{
  aaa(){B}
}
class implements A,B{}         
──────────────────────


Runnable
  • run()메소드를 오버라이딩 하여 사용
  •  public void run(){} ┃

  • 클래스의 객체 생성
  • 생성한 객체를 인자로 Thread객체를 생성
  • 쓰레드 객체의 start()메소드를 호출하여 쓰레드 실행


Thread-Runnable를 이용한 예제를 살펴보자.
  Given : Thread3.java
 1
2
3
4
5
6
7
8
9
10
11
12
13
14
15
16
17
18
19
20
21
22
23
24
25
26
27
28
29
30
31
32
import javax.swing.*;
public class Thread3 extends JFrame implements Runnable{
    public static void main(String[] args){
        System.out.println(":::::::::main Thread Start:::::::::");
        Thread3 t3 = new Thread3();
        //[1]Runnable 구현한 클래스를 객체화
       
        Thread t = new Thread(t3);
        //[2]Thread 클래스로 새로운 쓰레드를 만드는데
        //생성자의 인자로 Runnable인터페이스를 구현한 객체를 넣음
       
        t.start();
        //[3]start()메소드를 호출.
       
        for(int i=0; i<10; i++){
            System.out.println("MyThread : "+ i);
           
            try{Thread.sleep(1000);
            }catch(Exception e){}
           
        }
       
        System.out.println(":::::::::main Thread End:::::::::");
    }
    public void run(){
    //    이 thread가 별개의 Runnable 실행 객체를 사용해 작성되었을 경우,
    //    그 Runnable 객체의 run 메서드가 호출됩니다. 그렇지 않은 경우,
    //    이 메서드는 아무것도 실시하지 않고 복귀합니다.
    //    Thread 서브 클래스는 이 메서드를 오버라이드(override)
    //    하지 않으면 안됩니다.
    }
}

 
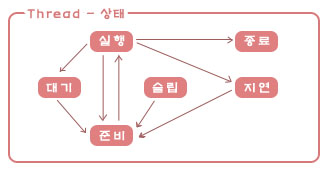
이미지 참조 : http://blog.naver.com/xyzeon

준비 : 실행상태로 들어가기 위해 준비하고 있는 상태로
           start()메서드가 호출된 쓰레드는 기본적으로 준비상태
실행: 쓰레드 스케줄러에 의해 선택되면 실행 상태로 들어가게 되며
          이때 run()메서드의 코드가 실행
종료: run()메서드가 종료되어 쓰레드의 실행이 완료된 상태로 한번 종료된
         쓰레드는 다시 실행상태가 될 수 없다. 실행상태가 될 수는 없지만
          객체가 사라지는 것은 아니므로 객체의 메서드나 멤버변수의 호출은 가능
실행정지: 실행이 정지된 상태는 대기,슬립,지연3가지 형태로 구분.
               실행정지 상태는 준비상태와는 다르게 특정 메서드의 호출이나
               이벤트가 발생될 때까지 실행되지 못함.
      •-대기: 동기화 블록 내에서 쓰레드 실행중지, notify()에 의해 깨워지기를 기다리는 상태
      •-슬립: CPU의 점유를 중지, 특정시간동안 대기
      •-지연: 입출력 메서드 등의 호출로 인해 해당 메서드의 종료가 일어날 때까지 대기하고 있는 상태
Thread-상태 참조 : http://blog.naver.com/xyzeon
반응형
LIST

+ Recent posts